


WRITTEN & PHOTOGRAPHED BY: STEVE HOLLOWAY

In the first sentence of his book On Directing Film, Director and Screen Writer David Mamet writes the main questions a director must answer are “where do I put the camera?” and “what do I tell the actors?”

It seems simple but putting them into practice showed me how to think like a director. And how to approach images like a cinematographer. To create a sense of place. Tell a story. Communicate an emotion. Involve a viewer.

This requires looking, really LOOKING, at the whole scene and finding the point of view that tells the story you see. Scan the edges of the frame. Look at the composition. Do you need to move closer? Farther away? (most images benefit from moving closer).
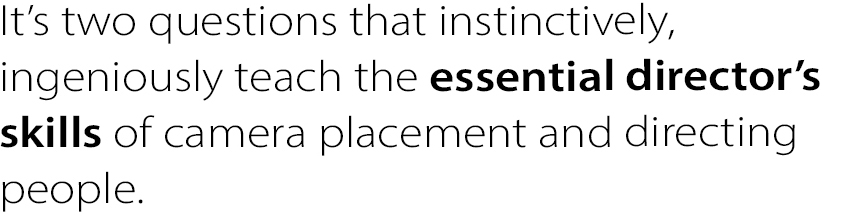
This image was created during an afternoon off from a Medicare New York assignment. I had finished shooting in Times Square and crossed the street to leave. I had all vertical images. I looked back one more time and realized there was a horizontal image there. I went back to the island in the middle of the crossing intersection and walked off the end. Seconds later Yellow Cabs were line up side by side. The lights changed and seconds later I captured 5 images as they moved past me and were gone. 2 of those images were combined to create this image. Photographed on a Canon 10 D.
When you’re looking, ask if there are distracting elements on the edges? Are there elements you can include on the edges, exciting elements that help tell the story you’re seeing?
And consider the dramatic circle of action. Will you place the camera inside the action (like the Times Square image above) giving the image a participant point of view where the action flows around the camera? Or will you place it outside the action like an observer or passerby?
How can you use the light that’s there. Do you need to add lighting to make the shot work? (don’t worry if you can’t add lighting, Apple’s HDR image capture almost always makes natural light look extraordinary).
Will you use a high or low angel, wide or narrow view, deep or shallow depth of field?
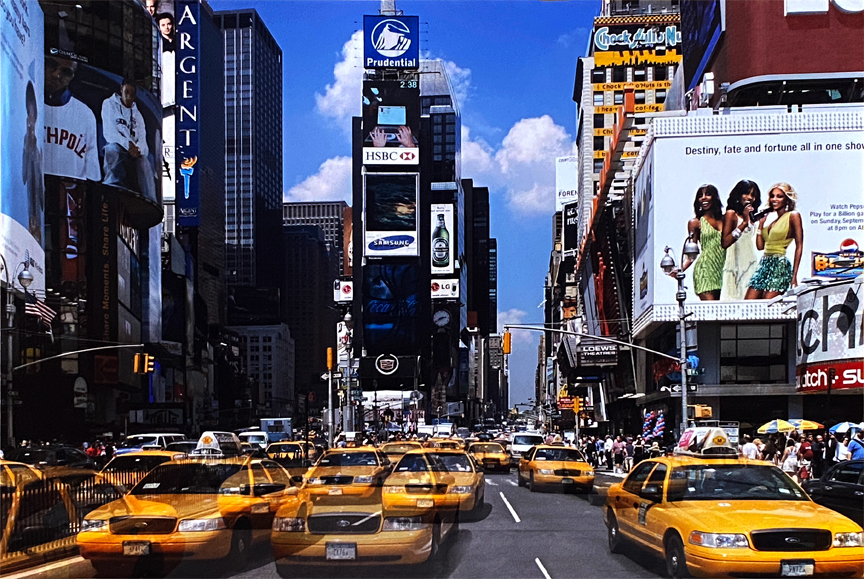
This example of camera placement is from our Back to the Coast road trip. I photographed Rockport Bay outside of our room at The Lighthouse Inn more than once. I wasn’t happy with any of the images.
The shots either had too much glare and contrast or they were too overcast.
Then, on our last night, during the “golden-hour”, the hour before sunset, I looked out the window of our room. The clouds had broken up and the sunlight was skimming perfectly across the water. Light changes every minute or so at the end of the day so time is urgent.
I hurried to get outside. I position two recliners side by side to add a foreground element that looked like they are waiting for a couple to come sit down.
I selected the iPhone 11 Pro Max ultrawide angle lens and started with a ground level point of view. Then eye level. Finally, I placed the camera at waist level and captured the above image.

If you’re working with people in the shot/scene, what you tell them is essential to capturing your idea. Where you tell them to look. What you tell them to do. How they interact. It’s up to you to make the image authentic and realistic. To project the attitude, emotion or expression you want to portray.
Learn what works for you. For me, “Sit up straight” never worked. Saying, “Pull your shoulders back” while actually pulling your own shoulders back as an example so they imitate you almost always works.
To change head position, the chin is an effective point of reference. “Chin up just a little” works. Again, move your chin up as an example. Head is a little crooked? I make a framing box with my hands, look through it at their face and say “straighten your face just a little” while moving in the direction you want them to move.
More often than not, people overcorrect, moving too much. “A little too much, back just a little” corrects it.


Smiles can be tricky. They can look forced or too big. Some people’s eyes completely close when they smile too big. When I’m going for the smile, I first give the direction of exactly where to look then, right before I shoot, I say “Bright smile”.
I borrowed this from a portrait photographer’s video I saw years ago and have been amazed at how well it has worked almost every time I’ve used it.
The example image above, photographed for the University of the Incarnate Word with a Canon 20D, became the anchor image for their Face of Texas campaign. Almost overnight, this image of the student in the hallway began appearing in television spots, on billboards, transit adverting, in newspapers and magazines. And it kept appearing over the next three years.
Want a serious expression. A lot of people don’t know how to “not” smile. It ends up looking like a confused or questioning expression. To get a serious expression, I tell people “Don’t worry about smiling. I’m looking for no affect at all.” I ask them to close their eyes, relax their face then open their eyes.
More than one person in the shot/scene? For groups looking in camera, all of the above still applies.

You can give them something to do. In this image the only direction was dance with your granddaughter. Photographed for Medicare Texas on a Canon 20D.
Or have everyone looking a picture, set of pictures or video on one of their phones. It focuses all their attention and what’s in the pictures will evoke expressions. Send a set of images or video you’ve selected to their phone (French Bull Dog puppies playing for example) and you can add a little extra control of facial expressions.

Some images almost direct themselves. After setting up the lights and elements for this image of the welders and choosing camera placement, the welders were moved into the setup. After placing hand position, the only direction was start welding. Photographed for Job Corps on an Olympus C 5050.
And all of these directions keep you behind the camera, ready to shoot.
Not every situation utilizes the whole process.
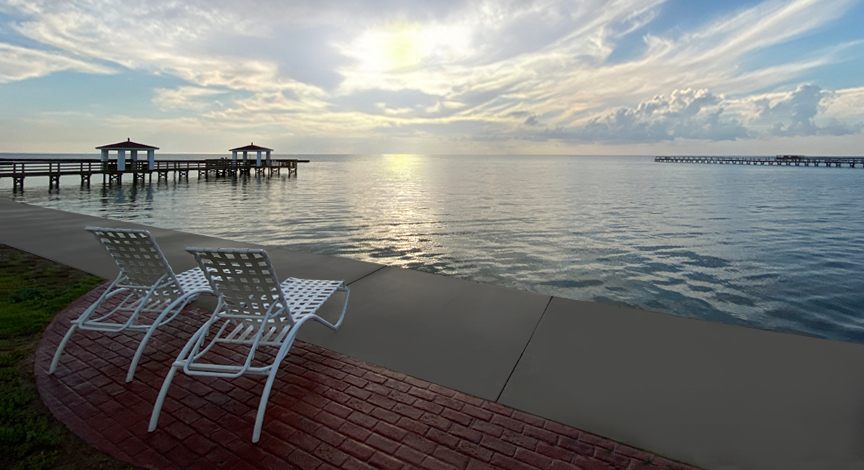
In this portrait of Chris, I told him that I wasn’t looking for a smile. That I didn’t want any discernable facial expression.
It’s is an approach I learned from photo-realist painter Chuck Close’s work.
Close’s idea was that you learn more about a person when facial expression doesn’t color what you see. Take away the smile and you take away the tendency to discount an image. To think “nice smile” and move on. Instead, you have to look deeper to form an opinion about what you see. You have to participate in the image.
Chuck Close’s work completely changed the way I look at portraiture. I always went for the smile, the open inviting, friendly smile. Chuck Close went for just the opposite.
Close’s paintings starting with 20×24 Polaroids so his process translates to photography videography.
I recall watching a video of one of Close’s photography sessions. He explained to his sitter not to worry about smiling, that actually he was “looking for no affect at all”, no emotion, no facial expression.
That phrase, “looking for no affect at all”, really stuck with me.
We lost Chuck Close in August of 2021. He will be missed and thought of often.
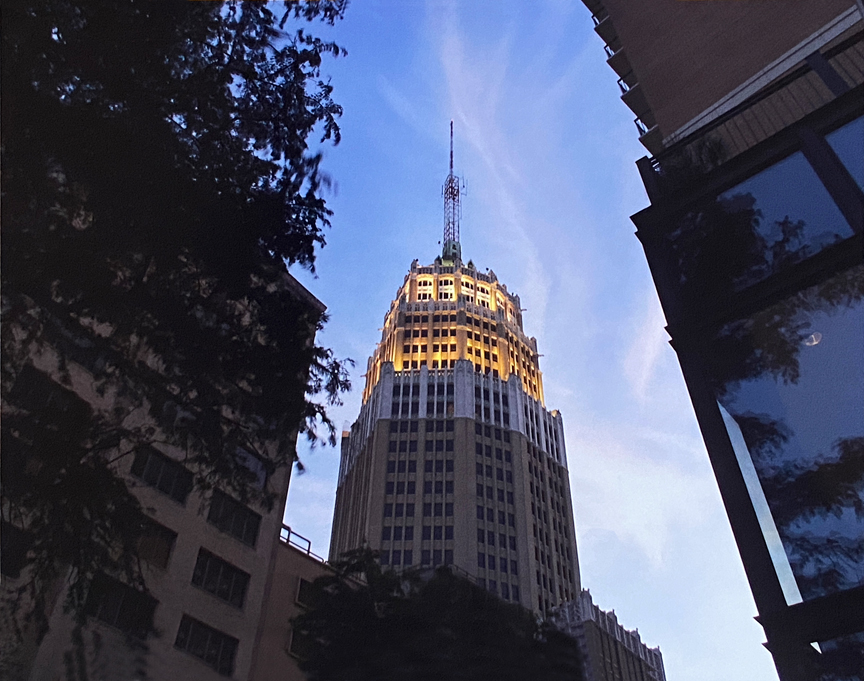

Architectural photography only gives you the options of choosing the time of day (for lighting) and where to put the camera (point of view). Tower Life Building photographed for Beldon, Texas with an Olympus E 10.
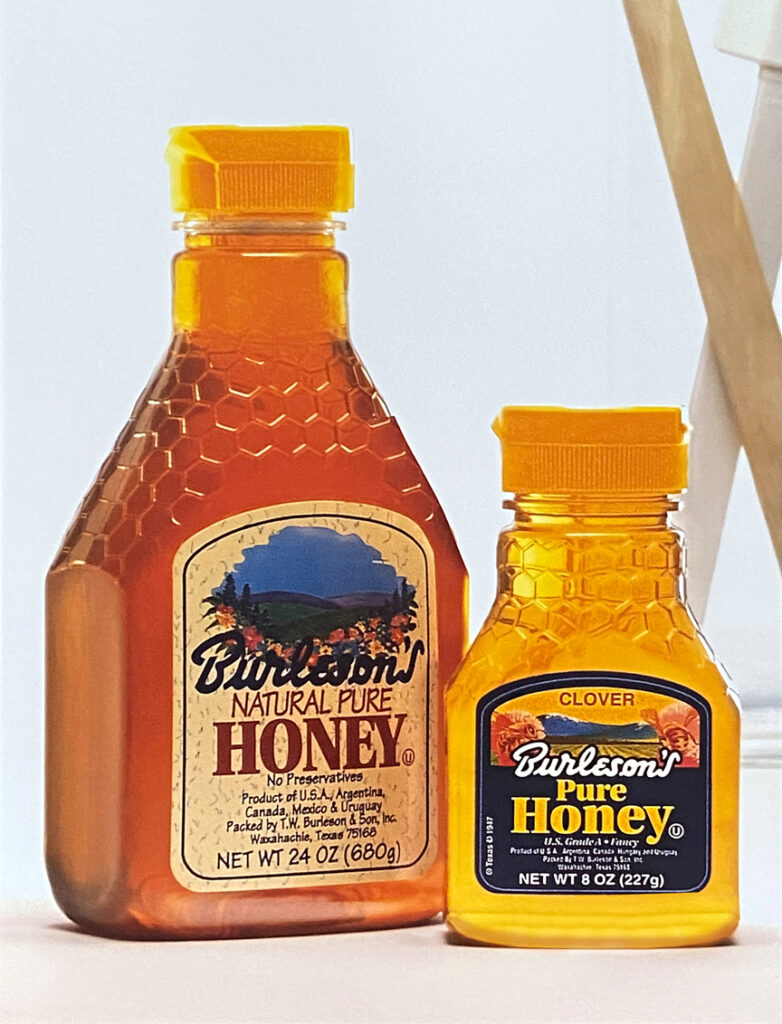

Still life photography only gives you the options of choosing where to put the camera and how you want to light the setup (natural light, window light, reflector fill or supplemental light, front, back, side or top lit). Portfolio image photographed with an Olympus E 10.
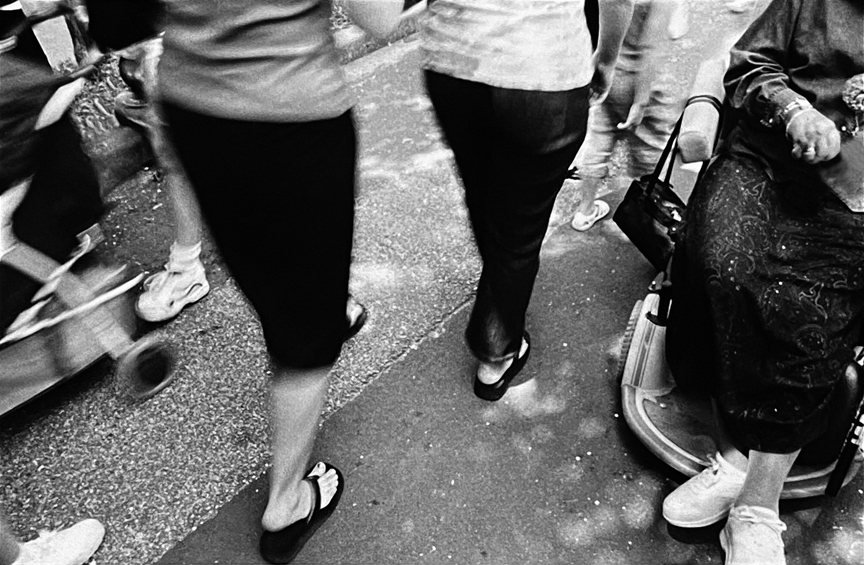

Shooting action shots and real life situations as they happen let you choose where to put the camera and from there it becomes a matter of timing to capture action/emotions as they happen. King William Fair photographed with a Nikon F3 on Tri X film.
I’ve gone into a lot of detail here about creating images. But, did you notice, I didn’t include a single reference to special lenses or neat, gimmicky accessories to make your images “great”?
Why?
Because those are just tools in a bag. Buying tools doesn’t have anything to do with having the ability to do something.
YOU make your images great. If you don’t develop a director’s skill set to take into the field, no camera or lens or accessory will save you. If you do, you can capture great images no matter what camera you have on hand.

Sometimes the Most Interesting Subject is Right at Your Feet
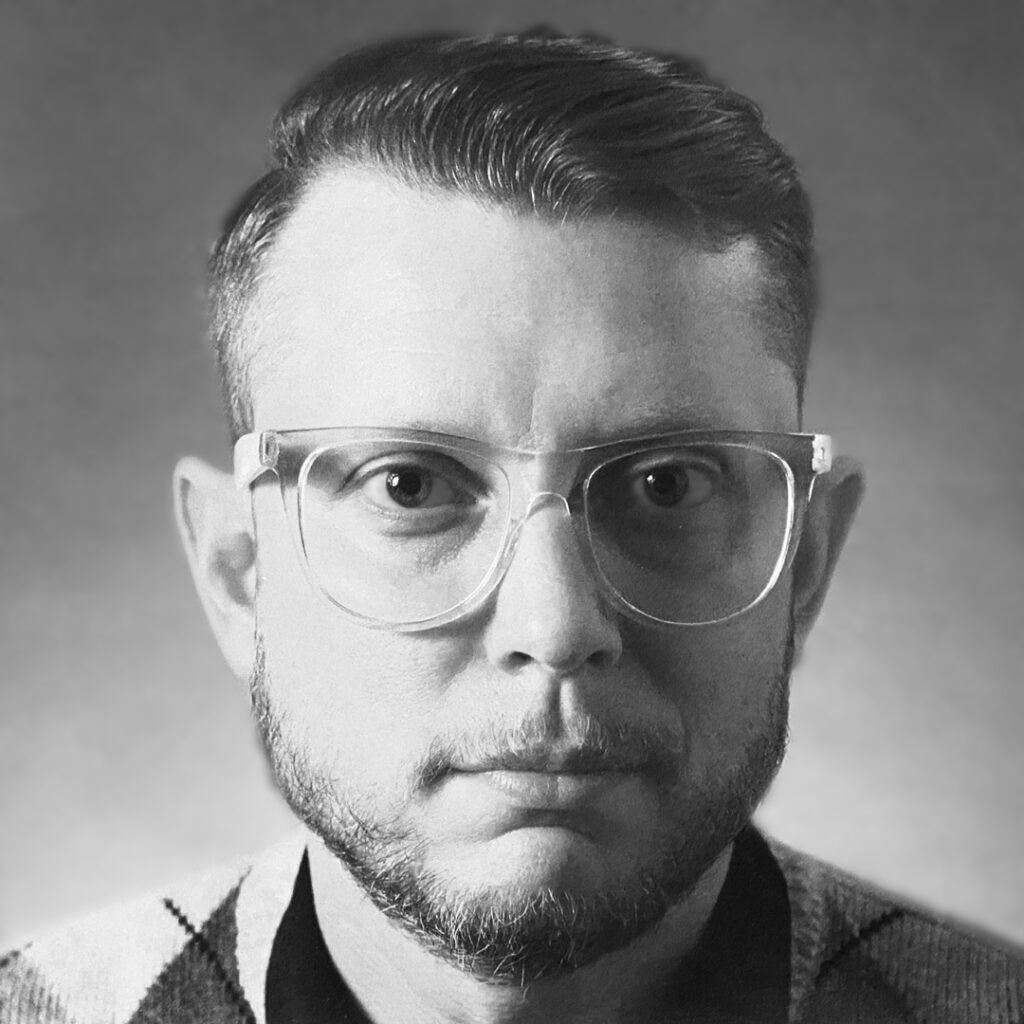
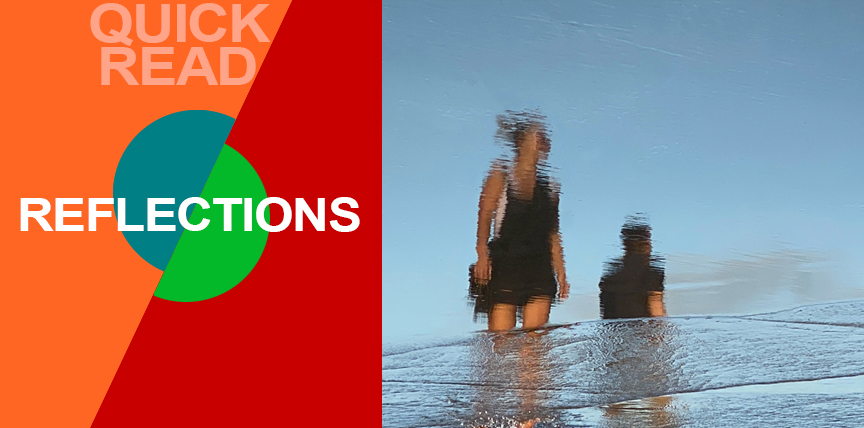
The beach reflection image (above) was captured midafternoon at Rockport Beach. I spent 5-10 minutes looking down at the sand, watching the people walk by and the ocean water come in and recede. I started shooting when the elements came together capturing this reflection as the ocean receded. The water ripples held enough detail that you can see it’s two people while turning them into abstractions at the same time.
Shooting reflections creates some of my favorite images. Look for glass or water in a scene that it reflecting a subject and choose your angle of view to control where the image is distorted.
Captured on an iPhone 11 Pro Max with Beastgrip and Bluetooth shutter release.


Jump to any Point of View how to guide, process deep dive or a pre iPhone portfolio plus how influences shape the storytelling process and a memoir that looks at the story behind the stories and to Nonlinear Content galleries and stories.

Introduction
Become a storyteller
Technology
- 02A Digital evolution.
- 02B Annie Leibovitz.
- 02C From Batman to the iPhone.
- 02D Henri Cartier-Bresson’s Leica.
- 02E Moving from film to digital to iPhone.
- 02F The self portrait series.
- 02G iPhone camera rigging.

- 03A Working with light.
- 03B The scout.
- 03C Shooting during the golden hour.
- 03D Photographing people.
- 03E Details, shadows, shapes and textures.
- 03F Plate shots and reflections.
- 03G Feed your passions.
- 03H People and food, two favorites.
- 03I On the road.
- 03J Wall art (it’s not what you think).
- 03K Transitional images.
- 03L Night photography.

- 04B Assemblages and abstractions.
- 04C Change the composition of an image.
- 04D Color correction vs color grading.
- 04E Create motion with Live Photo.
- 04F Resize images and retain detail.
- 04G Software and skill building resources.
- 04H On device apps.
- 04I Offboard resources.

- 05A Two key iPhone features.
- 05B Camera and light kit ideas.
- 05C Copied on iPhone.
- 05D Learning post production.
- 05E Designing with type.
- 05F Learning from cinema.
- 05G The three lens solution.


