


USB-C is making it faster and easier to attach iPhone to external storage devices and to find and export images and videos.
WRITTEN AND SHOT ON iPHONE BY: STEVE HOLLOWAY
Before USB-C, transferring images and videos off of iPhone was problematic. You were limited to downloading images and videos directly to a laptop or desktop. The adapter cable you needed to access these USB-A devices provided slow transfers.
iPhone uses the same port and cable for charging that it uses for transfers so you wanted your phone to be fully charged to avoid running out of battery charge part way through a transfer.
Once attached, your laptop or desktop viewed the iPhone as a single, unpartitioned external drive with a single folder that held EVERYTHING!
It brought new meaning to the old phrase “hunt and peck”.


The first iPhone used the same 30 pin docking connector used for earlier iPod models for charging and data transfer. It was physically large and wasn’t reversible so you had a 50/50 chance of getting it right (or wrong).
Next, Apple introduced the Lightning connector in 2012 on iPhone 5. It was smaller, reversible and provided faster transfers with speeds of up to 480 Mbps.
Then came the USB‑C connector. Initially developed in 2012 by a group of companies including Apple Inc., Intel, HP Inc. and Microsoft, USB-C was first used by Apple on iPhone 15.
USB-C on iPhone 16 and 17 models are limited to USB 2.0 transfer speeds of up to 480 Mbps, while the Pro models support faster USB 3.0 speeds of up to 10 GBs!!
I’ve used all three and can tell you the USB-C connector fixes every “I wish iPhone did that” short coming of earlier solutions.
![[ IMAGE: LEXAR JUMP DRIVE ]](https://nonlinearcontent.com/wp-content/uploads/2026/03/JUMPDRIVE-v3-IMG_4077-864P.jpg)

The biggest changes USB-C brings to the iPhone workflow are fast read/write times, the ability to write images and videos directly to a JumpDrive or SSD and the ability to shoot high resolution videos directly to an external SSD.
Getting images from iPhone to external storage for off board post processing was always a workflow “hat trick”.
One device changed that.
Aptly named by Lexar, the JumpDrive is the nexus of my new workflow.
I use the 256GB, USB-C / USB-A 3.2 JumpDrive (Amazon $39.49). On one end of the drive there’s a USB-C plug to attach directly to iPhone. Rotate the drive 180 degrees and there’s a USB-A plug on the other side to attach to my laptop.
A 256GB dual connect thumb drive!
In today’s “terabyte storage universe”, 256GB might not sound like a lot.
But I remember the early days of digital postproduction, working on a desktop computer with multiple brick size LaCie external hard drives. The first drives were only 160GB. Later models were 250GB and 500GB. They weren’t small. They weren’t self powered. And they weren’t $39.49.
I used drives in matched pairs. One drive had active, working files and the second drive was an exact backup of the first drive for off site storage.
The real JumpDrive timesaver is the ability to “see”, select and move images and videos from iPhone albums directly to the external drive.
Transferring files couldn’t be easier (or faster). Plug the JumpDrive into iPhone. Create a folder on the drive. Open the Photo App. Go to the library or an album. Select images and “share” with the JumpDrive (step by step guide in the how to section below). Done.
It’s same process as adding images to a text or email and sending.
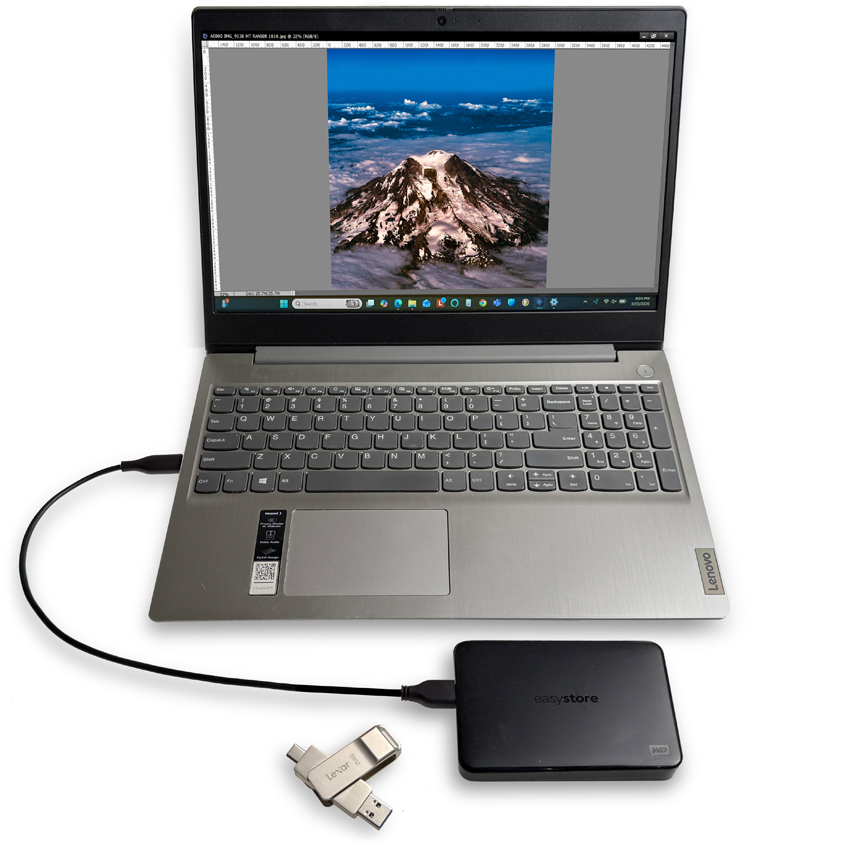

My new workflow is built around a compact, portable kit.
I use a Lenovo laptop running an SSD drive, a Western Digital Easy Store 1TB SSD external drive for active, working files and a 256GB Lexar USB-C / USB-A JumpDrive to transfer files for off board post production and for backups.
When I work from home, I add a calibrated external LG monitor.
Today, I keep the Lexar JumpDrive in my go bag. I create an iPhone album with image files I want to export, insert the JumpDrive, move the files then move the JumpDrive to the laptop and load the images to the Easy Store for post production.
And there’s plenty of room on the 256GB JumpDrive to use for transfers and to backup my Easy Store drive.
James Cameron’s advice on how to become a director? “Pick up a camera. Shoot something. No matter how small. No matter how cheesy. Put your name on it as director. Now you’re a director.”
Not that long ago, the “pick up a camera” part would have been limited to 8mm for the majority of us and 16mm for a few. And even that was too expensive for some.
Today, USB-C and iPhone make it possible for every filmmaker and videographer at every level to use the same technology used by director Danny Boyle as the principal camera to make the 60 million dollar film, 28 Years Later.
And for still photographers exploring new ways to tell a story for digital or print projects.
The small iPhone form factor creates a flexible, agile, affordable image capture system that can become a part of high end, high resolution work flows.
First, create a file on the JumpDrive to transfer to:
- Plug the USB-C JumpDrive directly into your iPhone.
- Locate and open the Files app.
- To access the Jump Drive, start by tapping on “Browse” at the bottom of the screen.
- Under “Locations,” select the USB-C JumpDrive. Tap the three dots (•••) in the upper right corner.
- Select “New Folder” from the menu.
- Enter a name for your new folder and tap “Done.”
Then transfer photos:
- Launch the Photos app on.
- Go to the album you want to use and select the photos (just like you would to attach them to a text message). Select the photos you want to transfer. You can choose multiple photos at once.
- Tap the Share icon (an arrow pointing out of a box) located at the bottom left corner.
- In the sharing options, select your jump drive as the destination.
- Select the folder you created and tap “Save” to begin the transfer.
- DONE!

Shooting 4K at 60fps uses around 12GB for a single minute of ProRes.
An external storage workflow enables 4K at 60fps ProRes recording with dedicated, high-capacity, high speed recording storage (no running out mid-shoot). And files can be edited on the drive, just connect to your laptop.
SanDisk offers low profile, 1TB and 2TB MagSafe devices that attach unobtrusively to the iPhone lens side including the Creator Phone SSD and Extreme Portable SSD 1TB or 2TB.
To record direct to SSD:
- Attach the Creator SSD magnetically to the back of your iPhone and attach the cable.
- Go to the native camera app on iPhone or third-party apps like BlackMagic. Set the app to record in ProRes format at 4K 60fps.
- Start recording.